Projects
The Projects functionality is available in the Project Management extension.
In this article:
- Projects
- Boards
- Access control
- Members
- Tasks
- Milestones
- Groups
- Plan view
- Board view
- Gantt view
- Project cloning
- Dashlet
- Shortcut keys
Projects
The Projects list view is available from the Projects tab in the navigation bar. Here you can create a new Project.
A project owner can manage the project team by adding or removing members (Users) and changing their roles in the project.
Each Project has a Stream. It can be used to post information or attach files. Project updates are automatically posted in the Stream.
A Project has Activities and History panels. Meetings, Calls, and Emails can be related to a Project.
Project categories
As of v1.4.
Projects can be organized into categories. Categories follow a hierarchical, tree-like structure.
Access to categories is controlled by Roles, with the Project Category scope. Only administrators can create or edit categories.
Boards
A Project Board defines board Stages for a Project. The Board field is mandatory in a Project. It can be set only when you create a Project. Multiple Projects can use the same Project Board.
Each Stage is mapped to a specific Status value. Multiple Stages can be mapped to the same status. For example, the In Progress and Review stages are mapped to the status Started.
Available statuses:
- Not Started
- Started
- Completed
- Canceled
- Deferred
A Task in a Project is usually assigned to a specific Stage. When a Stage is changed, the Task's status is automatically changed to a mapped status.
The Default Project Board is available out of the box. You can create new Project Boards. When you create a Project Board, default Stages are automatically added. You can rename the Stages or add new ones.
To access Boards, go to: Projects list view > top-right menu > Boards.
Access control
Access control for Projects is managed by Roles and project-level roles.
Roles
To be able to access Projects, a user must have the Project scope enabled in Roles. For minimum access, set: create = no, read = own, edit = no, delete = no.
To be able to create Projects, a user must have Create access for the Project scope and Read access for the Project Board scope.
Project-level Roles
A project owner or a user with Edit access can manage project members. Each member has a specific project-level Role.
Built-in roles:
- Owner – can edit the Project; can manage members; can create and edit Tasks; has access to the Stream of the Project;
- Editor – can edit the Project; can create and edit Tasks; has access to the Stream of the Project;
- Member – can view Tasks assigned to them; can move assigned Tasks between Stages; can edit Tasks they own.
The admin can create custom Project Roles. The Project Roles list view is available at: the Project list view > the dropdown menu in the top-right corner > Roles.
Project Roles allow fine-grained access control.
A Project Role defines the following Task related permissions:
- Create – yes/no – can create Tasks;
- Assignment – all/own – whom can assign Tasks to;
- Read – all/own – what Tasks can view;
- Stream – all/own – access to the Tasks's Stream;
- Edit – all/assigned/own – what Tasks can edit;
- Stage Edit – all/assigned/own – what Tasks can move on the board;
- Delete – all/own/no – what Tasks can delete.
It also defines one Project related permission:
- Project Stream – yes/no – can view the Project's stream (as of v1.4).
Note
If a project member has access to the project's stream but does not have access to a task, they can still see that task in the stream. But they cannot open it to view details.
Members
The Members panel is available in the Project's detail view, in the button under the the Teams tab. Here, the project owner can add or remove members as well as change their roles.
It's possible to add or remove members for multiple projects at once from the Projects list view.
Tasks
In the Project Management tool, a Task is represented by the Project Task entity type.
A Project can have multiple Tasks. Tasks can belong to different Groups. Tasks can be re-ordered within a Group. Tasks are also placed in specific Stages of the Board.
Tasks can have Sub-tasks.
Status
Available Task statuses:
- Not Started
- Started
- Completed
- Canceled
- Deferred
The Status field is read-only: it cannot be edited explicitly. The status is updated automatically after changing the Stage value (moving the Task on the Board) and when completing or canceling the Task.
Stage
The Stage field indicates in which Stage a Task is placed on the Board. It also defines the Status of the Task.
The available Stages in a Project are defined by the assigned Project Board.
A project member with the Member role has access to update the Stage field.
Group
The Group field defines in what Group a Task is placed in.
When creating a new Task, the Active Group of the Project is pre-selected.
Task dependencies
A Task can be dependent on multiple Tasks.
There are the following dependency types:
- Finish to Start – the predecessor must be finished before the successor can be started;
- Finish to Finish – the predecessor must be finished before the successor can be finished;
- Start to Start – the predecessor must be started before the successor can be started;
- Start to Finish – the predecessor must be started before the successor can be finished.
The dependency type can be omitted: in this case, the dependency will be only declarative but not required. Meaning, it will be possible to finish a successor Task regardless of the predecessor's status.
The default dependency type can be set at: Administration > Entity Manager > Project Task > Fields > Dependency Type.
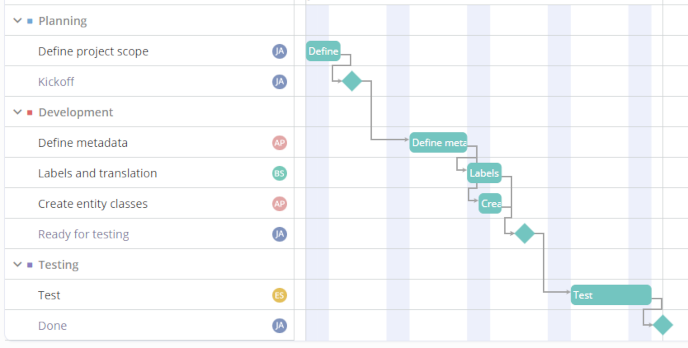
The label color indicates the predecessor's task status. Gray – Not Started, Blue – Started, Green – Completed.
The task dependency feature can be enabled or disabled in the Project settings (dropdown next to Edit > Settings).
Owner
The Task's Owner is a User who oversees the Task. A User who created a Task automatically becomes the Task's Owner.
Assignee
The Assignee of a Task is a User who is responsible for performing the Task. A Task can be unassigned.
Only members of the Project can be selected as assignees.
Collaborators
The Collaborators feature can be enabled per project in the Project settings (dropdown next to Edit > Settings). Users who are collaborators can view the Task and post in its Stream. This feature is useful when multiple users perform the same task.
Timeline
A Task can have a Date Start and Date End. Both are non-mandatory fields.
Priority
Available priority values:
- Low
- Normal
- High
- Urgent
The Priority field can be enabled or disabled in the Project settings (dropdown next to Edit > Settings).
Points
Is meant to represent the relative complexity of the Task, amount of work needed to complete the Task. The field can be enabled or disabled in the Project settings (dropdown next to Edit > Settings).
Note that if the team won't use Points, the administrator can hide the field in the Entity Manager.
Hours
May represent how many hours is required to complete the Task. The field can be enabled or disabled in the Project settings.
Sub-tasks
A Task can have sub-tasks. A task that has sub-tasks can be completed only when all sub-tasks are completed or canceled.
Sub-tasks can be owned by and assigned to different Users.
Sub-tasks can be re-ordered by dragging and dropping.
Stream
A Task has a Stream. The Stream can be used for communication between the Project's members. It also shows Task's updates.
Milestones
A milestone is a significant point in a project's timeline that marks the completion of a key phase.
Groups
A Project has a unique set of Groups. A project Owner or Editor can manage Groups of the Project – add, remove, and edit.
To add a new Group to the Project, open the Plan view, click Create Group from the dropdown next to the Edit button. To reorder existing groups, click Reorder Groups from the same dropdown, then use dragging to reorder listed groups.
Tasks are ordered within their Group. It's possible to reorder Tasks and move Tasks from one Group to another.
A specific color can be assigned to a Group.
When a new Task is added to a Group, it is placed either at the top or the bottom depending on the parameter Group's parameter New Task Placement.
Group type
A specific type is assigned to every group. The following types are available:
- Triage
- Backlog
- Work
- Phase
- Sprint
The Work type is set by default.
Only Work, Phase and Sprint groups are displayed on the Gantt chart.
The Project Task dashlet allows you to limit tasks by specific group types. For example, one may want to list only tasks from the Work and Sprint groups, or display only Triage tasks in a separate dashlet.
Group types are also useful for automation. For example, a workflow rule can be triggered when a task is moved to a Sprint group. A single rule can be applied across all projects.
Another application of group types is Dynamic Logic. For example, the Assignee field can be automatically required if a task is linked to a group of the Work type.
The Project Task entity type has a foreign field Group Type, which holds the type value of the related Group. It can be used in conditions of the Dynamic Logic.
Calendar
Requires EspoCRM v9.2.
Project Tasks can be displayed on the Calendar in read-only mode. For this, an administrator should enable Project Tasks under: Administration > Settings > General > Calendar Entity List.
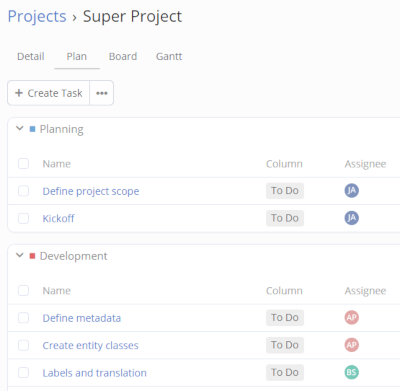
Plan view
Here, you can see Tasks in Groups. You can add new Groups, remove Groups, and reorder Groups. Here, you can also create, edit, and remove Tasks.
By using drag-and-drop, it's possible to reorder Tasks within a Group or move Tasks from one Group to another.
To reorder Groups, click Reorder Groups from the dropdown menu, use drag-and-drop, and then apply changes.
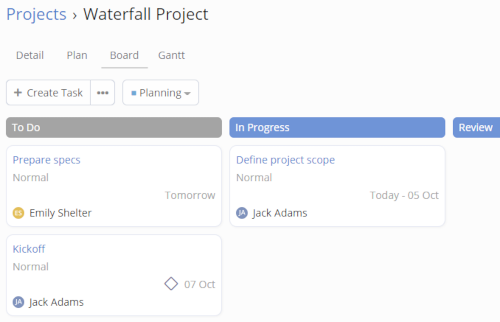
Board view
On the Board view, tasks are visualized as sticky notes. This tool is also known as a Kanban board.
It's possible to drag tasks from one column to another and reorder tasks within a column. Columns represent task's Stages.
Stages of the board are defined by the Project Board assigned to the Project.
The Board view displays tasks from only one Group at a time. You can switch between Groups to view tasks from different ones.
Gantt view
The Gantt view visualizes the timeline of a project. It shows:
- start and end dates of tasks and their durations;
- milestones;
- tasks dependencies.
You can drag Tasks to change their timeline and resize to change their duration. By holding the CTRL/⌘ key, you can select multiple Tasks and drag them together.
If you select two Tasks, you can manage their dependency:
- add a dependency;
- remove an existing dependency;
- change the type of an existing dependency.
The order in which you select two tasks determines the direction of the dependency. You can also click on a dependency path to select two tasks which this path connects.
When creating a task or milestone while another task is selected, it will create a dependent task in the same group right after the selected task.
If the default Working Time Calendar is set in the system, non-working days will be highlighted with a darker background.
The Gantt view can be disabled for a specific Project in its Settings.
Project cloning
A Project can be cloned along with its Groups and Tasks. Optionally, it's possible to also include:
- Members
- Task Owners
- Task Assignees
- Attachments
The Date Start should be set in the source Project. When cloning, the user needs to set a new Date Start for the Project. Dates of cloned Tasks will be calculated based on the difference between the source and cloned Projects.
To be able to clone a Project, the user should have create access to the Project scope and edit access to the source Project. To clone a Project, open the detail view and click the Clone action from the dropdown next to the Edit button.
If you clone a Project and then decide to remove it, it won't be possible until you remove all related Tasks.
Dashlet
Users can add the Project Task dashlet to their dashboard. They can add multiple such dashlets, each with different options.
Dashlet options:
- Next X Days – the number of future days from which to display tasks;
- Include Owned – to list tasks where the current user is the owner;
- Include Shared – to list tasks where the current user is in collaborators;
- Exclude Assigned to Me – to exclude tasks assigned to the current user;
- Limit by Group Type – to list only tasks from specific group types; for example, exclude Backlog tasks;
Shortcut keys
Ctrl + Backspace– complete selected Tasks from the Plan view;Ctrl + Quote– self-assign selected Tasks from the Plan view; only unassigned tasks are affected;