Import
Provides the ability to import records from CSV files.
An administrator can access the Import tool at Administration > Import. By default, regular users don't have access to Import but it can be granted in Roles. The administrator can also add the Import tab to the navbar at Administration > User Interface > Tab List.
In this article:
Step 1
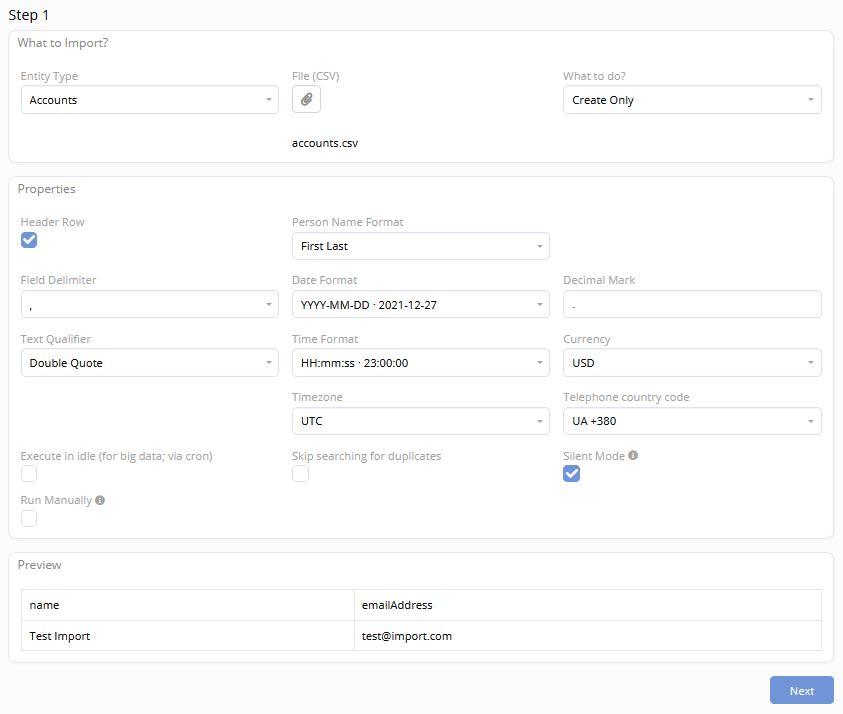
Select what type of records you need to import (Entity Type field). Select a CSV file. A file should be formatted in UTF-8. Select What to do?. Available options: Create Only, Create & Update, Update Only.
- Create Only − import will only create records;
- Create & Update − records will be created, if records with matching field values are found, they will be updated; you will be able to check what fields to match by on the Step 2.
- Update Only − records with matching field values will be updated.
Once you select a CSV file, you will be able to see how it will be parsed in the Preview panel. When you change parameters, the preview is updated.
Parameters:
- Header Row − whether a CSV file has the first row with field names.
- Execute in idle − is recommended if you import a big number of records; import will be processed via cron; the status will be set to Complete when the import process is finished.
- Skip searching for duplicates − will make the import faster.
- Silent mode − the majority of after-save scripts will be skipped; Stream notes won't be created, workflows will be skipped; checking will make the import faster.
- Run Manually − you will need to start the import manually from CLI. The command will be shown after setting up the import.
- Telephone country code − phone numbers in a regional format will be converted to the international format according the selected country. (as of v8.1)
Click the Next button to proceed to the Step 2.
Step 2
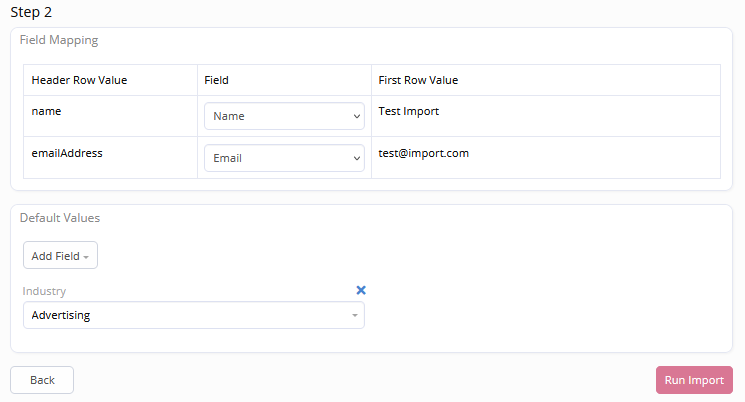
Set up the field mapping – how fields correspond to columns in the CSV file. Not mapped columns will be ignored.
If the import mode is Create & Update or Update Only, you also need to check the fields that will be used to find the records to update. For example, if you tick update by the Name field, then records where the Name matches the value in the CSV file will be updated.
Add Default Values that you want new and updated records to set with. For example, you can specify values for the Assigned User and Teams fields to be applied by default.
After import is done, you will have the ability to revert created records. You will be able to see which records were recognized as duplicates and which were updated. Duplicate means that there was a similar record in the system. You can remove all imported duplicates at once or remove only specific ones.
Important
Revert doesn't work with updated records, you cannot revert the update.
Click the Run Import button to proceed. It may take some time before the import process gets finished. If you want to import a large bunch of records, it's recommended to run import in idle.
Import results
Remove import log
Once the records are imported and you are sure that imported data is fine, you can Remove Import Log (by clicking the button on the import results view) to preclude accidental reverting of the import.
Revert import
Revert Import will remove all imported records permanently.
Important
Updates caused by import are not reverted.
Remove duplicates
This will permanently remove all imported records that were recognized as duplicates.
New import with same params
This will create a new import with the same parameters and field mapping.
Importing into Target List
When you import Contacts, Leads or Accounts, you can add them to a specific Target List. On the Step 2, you need to add the Target List field in the Default Values panel and select a needed Target List record. You can also use Update only or Create & Update import type to link existing records with a specific Target List.
Relations
It's possible to automatically relate imported records by a foreign name. For example, when you import Opportunities, if you have Account names in a CSV but don't have Account IDs, Accounts with corresponding names will be automatically related with imported records. Note that this functionality is only available for many-to-one relationships.
It's also possible to automatically relate imported records by a Foreign field other than the Name. The Foreign field should have Relate on Import parameter enabled. The feature is available as of v8.2.
Console commands
Run import:
php command.php import --id={import-id}
The import must be created via the UI before. It should have Run Manually parameter checked.
Resume failed import (from the last processed row):
php command.php import --id={import-id} --resume
Revert import:
php command.php import --id={import-id} --revert
Import file:
php command.php import --file=path/to/csv --params-id={import-id}
--params-id is ID of a previously run import. Its parameters will be used for the import.
Errors
As of v7.2.
All rows that failed to import will be available in the Errors panel on the Import result view. It's possible to view the reason of the failure (usually it's validation), the index of the failed row and values. To view error details, click the View action from the dropdown.
There's the ability to export all failed rows back to a CSV (in order to fix them and then re-import).
Integrity-Constraint-Violation
Occurs when importing an ID that already exists. Most likely, you didn't reverted the previously imported records and try to import them again.
Validation
Validation is applied for imported records. If a row does not pass validation, the record won't be created.
Enum fields
When importing to an enum field, values in a CSV should be the same as values (options) defined for the field in Espo. If your data source uses different values, consider replacing them in the CSV before importing. One can utilize the VLOOKUP function in the spreadsheet app or use simple Find & Replace.
If you import an empty value, but your enum field does not have an empty option, the validation will not pass.