IMAP and SMTP configuration
In this article:
IMAP configuration
Note
You need to have cron properly configured in your system to have inbound emails working.
IMAP allows you to retrieve your emails from a mail server. To set up an IMAP account, do the following steps:
- Go to Emails Tab > top-right menu > Personal Email Accounts.
- Click on Create Personal Email Account.
- In the Main section, specify your Email Address. The Name of the personal email account is generated automatically, but you can change it. Fetch since allows you to choose a date from which emails will be imported. If you want to archive old emails, set it to some past date.
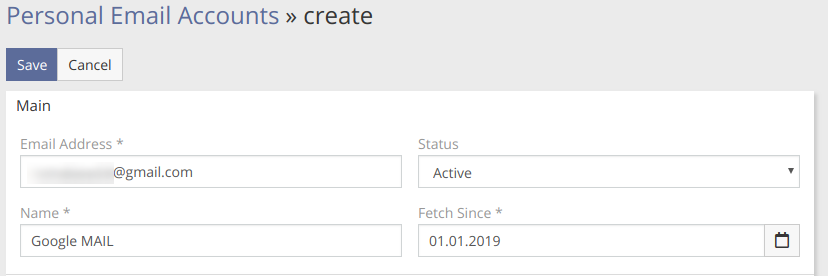
- In the IMAP section, enter your Host name, your Username and Password. Tick off SSL for a secure connection. The IMAP Port will be generated automatically.
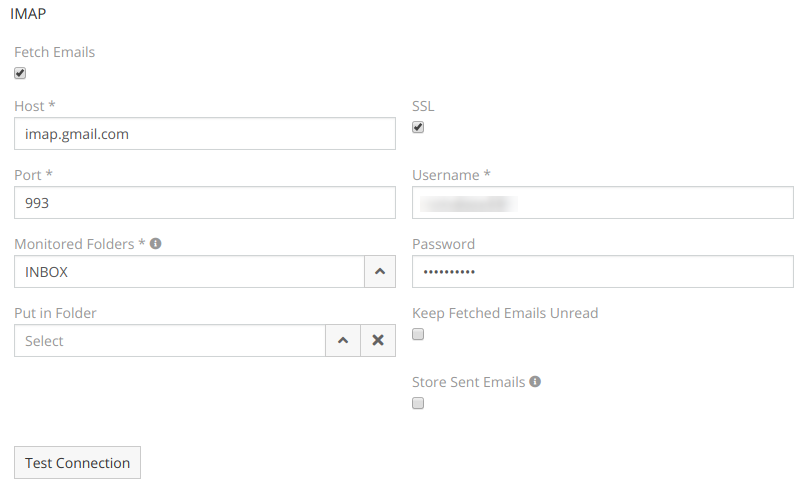
- Specify what folders to monitor in the Monitored Folders field. By default, it is set to INBOX. If you use some external email client to send emails, you can add the Sent folder to archive those emails.
- Put in Folder field allows you to specify an Espo email folder in which incoming emails will be put.
- Click on Test Connection to check whether everything was set correctly. If the connection is successful, click Save.
SMTP configuration
SMTP is for sending emails. Users can setup SMTP settings their Personal Email Accounts. An administrator can also allow to use the System SMTP (by marking it shared).
Users can have multiple SMTP accounts. However, email addresses a user can use to send emails from are defined by email addresses of the User record (Administration > Users).
To set up an SMTP account, do the following:
- Navigate to the Personal Email Accounts page: Emails Tab > top-right menu > Personal Email Accounts.
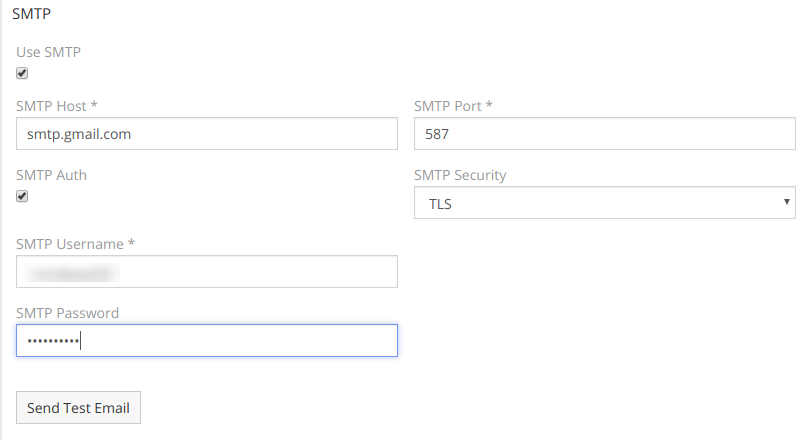
- Tick off the Use SMTP box.
- Enter your SMTP Host name, in the SMTP security field select STARTTLS or SSL/TLS for a secure connection. The proper SMTP Port will be set automatically.
- Tick off the SMTP Auth box and enter your Username and Password.
- Click on the Send Test Email button to send a test email to a specified email address.
- Save.
Google Workspace
- Sign into your Google Admin console.
- Navigate to App > G Suite > Gmail > Advanced settings.
- Select the organizational unit in the organizations section.
- Under the POP and IMAP Access, uncheck the Disable POP and IMAP access for all users box checkbox.
- Each user has to enable IMAP access as described for Gmail Account.
Gmail
- Sign into your Gmail Account.
- Select
 > Settings.
 - Click the Forwarding and POP/IMAP tab.
- In the IMAP access, select Enable IMAP.
- Click on Save Changes.
Note
There are two ways in which you can set up IMAP and SMTP for Gmail account:
- Use the Google Integration extension that provides a secure authentication via Oauth2.
- Use a generated App Password. Requires enabling 2-step verification for your Google account.
For more information, follow the link.
Outlook
To be able to connect to Outlook.com or Microsoft 365 email accounts, you need to install the Outlook Integration extension.
- Go to your Outlook Account.
- Open Settings .
- On the navigation panel, select Mail > Forwarding and IMAP.
- Sign in if required.
- Check Let devices and apps use IMAP. Here you can also view your IMAP and SMTP settings.
- Click Save button.
Important
If the STARTTLS encryption method does not work for IMAP, try the SSL/TLS method.
Yahoo
Configuration details are available here.
See also
See the articles for specific providers: